Are you ready to elevate your bedroom into a stylish sanctuary? One of the most transformative elements you can incorporate is a down ceiling design. This innovative approach not only enhances the visual appeal of your space but also creates an inviting atmosphere that can redefine your nightly retreat.
Imagine walking into a room where the ceiling draws the eye upward, accentuating height and depth while providing a cozy, modern vibe. Down ceilings allow for creative freedom, offering opportunities to play with textures, colors, and lighting—making them a focal point in any bedroom renovation.
What makes this project even more exciting is the chance to personalize your space through DIY efforts. By taking on a down ceiling design yourself, you can infuse your unique style into every detail.
Whether you’re a seasoned DIY enthusiast or just beginning your home improvement journey, this project is an excellent way to express your creativity while sticking to a budget. Plus, there’s something immensely satisfying about transforming your own space with your hands.
In this article, we’ll guide you step-by-step through understanding down ceilings, planning your project, and bringing your vision to life with practical tips and inspiring ideas. Get ready to discover how easy it is to create a stunning bedroom environment that reflects who you are!
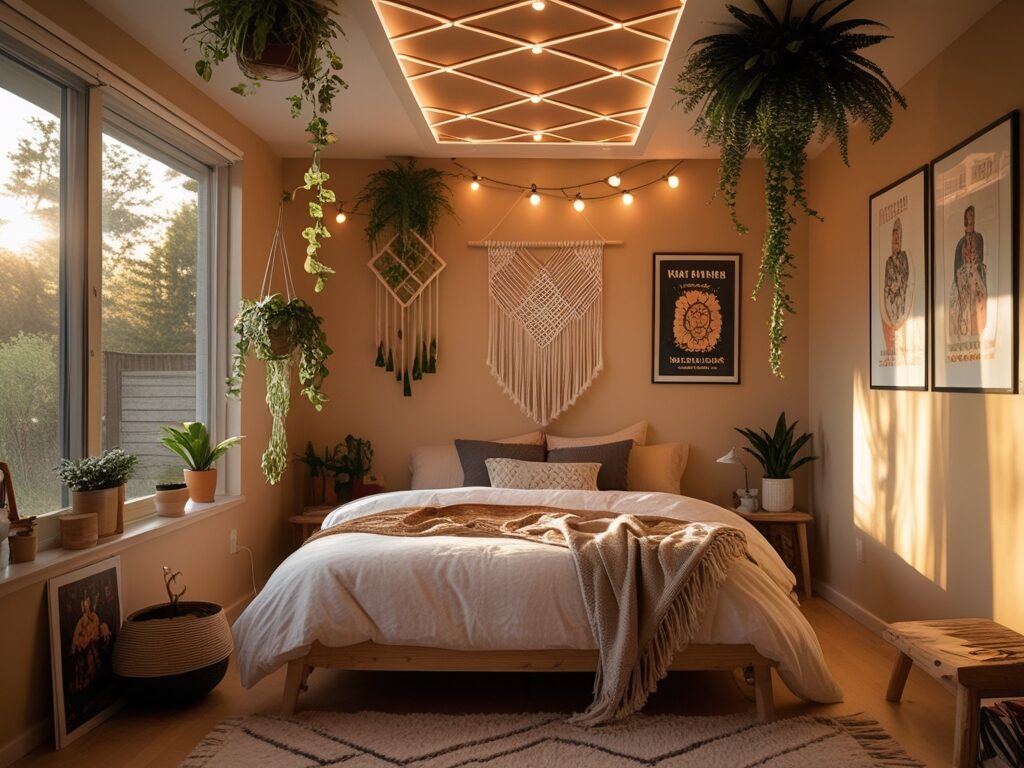
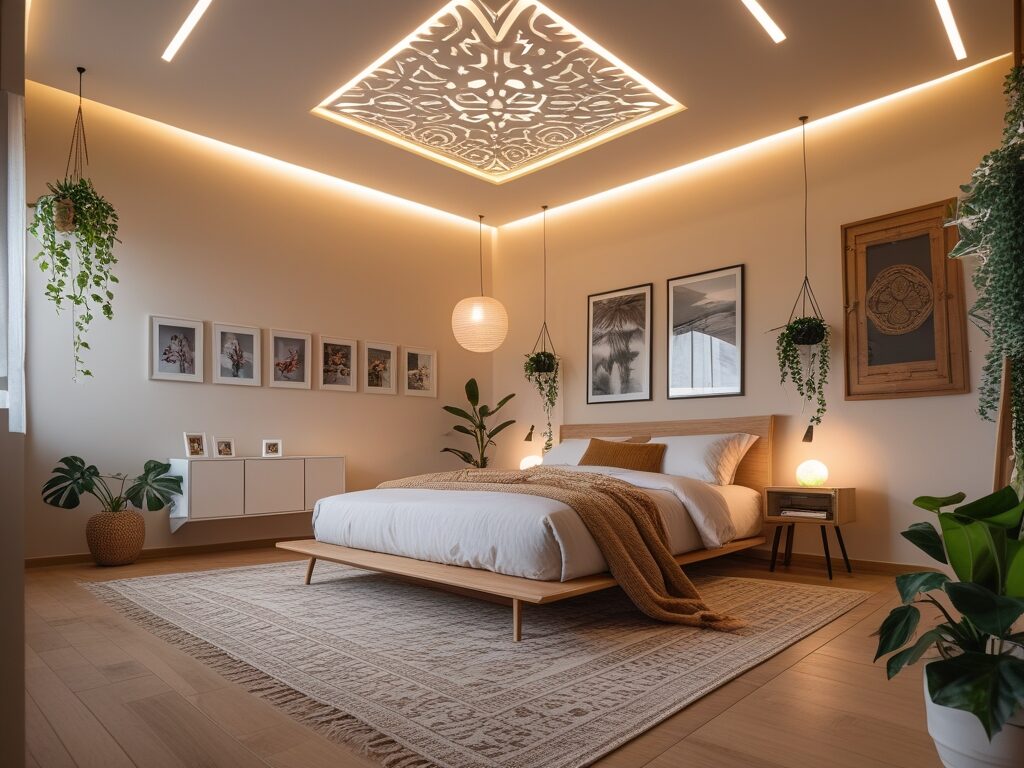
Understanding Down Ceiling Design
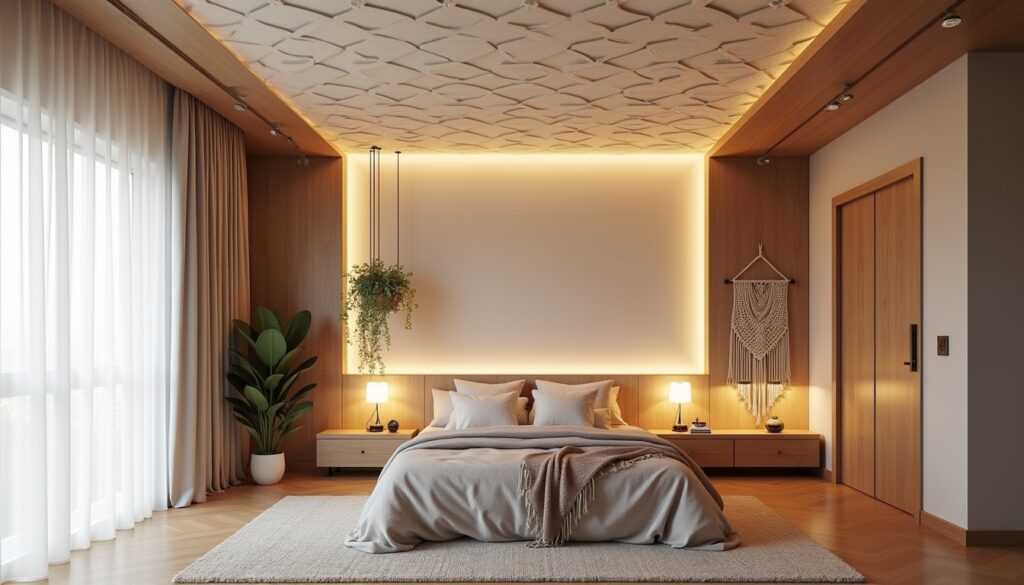
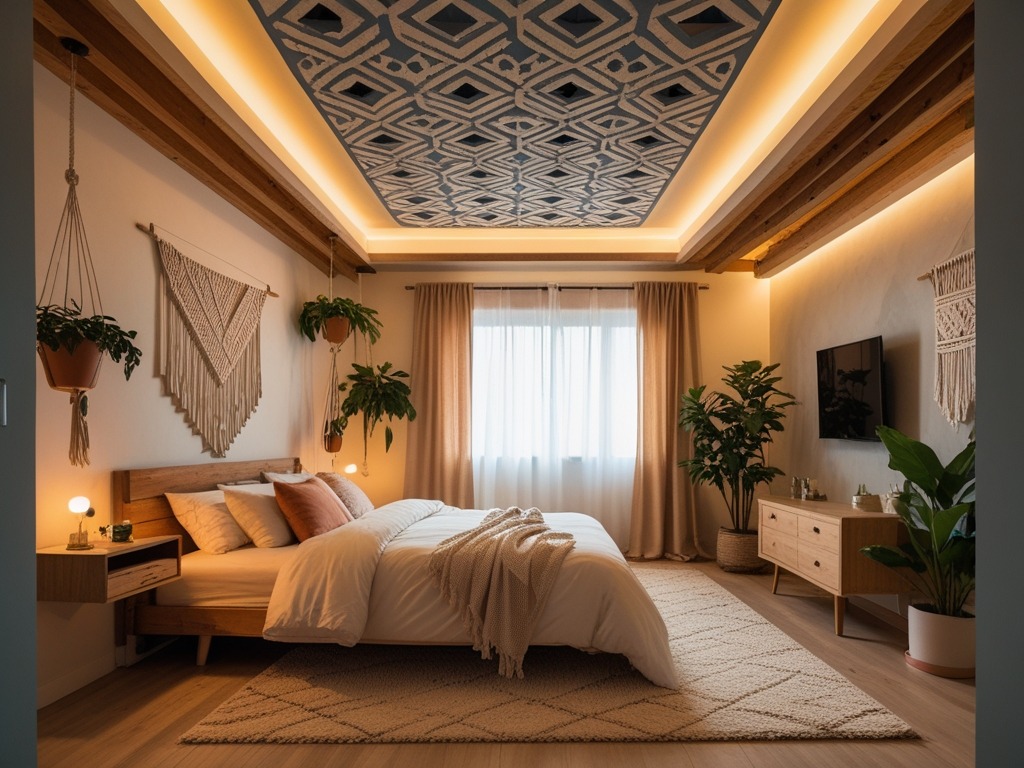
Down ceiling design, also known as a drop ceiling or suspended ceiling, involves installing a secondary ceiling below the main structural ceiling. This design feature typically consists of lightweight panels that can be customized to fit various aesthetics.
The beauty of down ceilings lies in their versatility; they can be used to conceal wiring and ductwork while also providing an opportunity for creative expression through unique shapes, colors, and materials. For instance, you might opt for sleek white panels for a modern look or textured wood finishes for a cozy, rustic vibe.
Incorporating down ceilings in bedroom design offers numerous benefits beyond mere aesthetics. One of the primary advantages is improved acoustics; the materials used can help absorb sound, creating a more tranquil sleeping environment.
Additionally, down ceilings allow for the integration of stylish lighting fixtures without compromising headspace, effectively enhancing the room’s ambiance. For homeowners on a budget, this is an affordable home decor option that can transform the overall feel of a space without requiring extensive renovations.
When it comes to popular styles and trends, contemporary designs often incorporate geometric shapes or layered ceilings to add depth and interest. For example, a coffered ceiling can create a sophisticated look with its recessed panels and molding details.
On the other hand, minimalist approaches may feature flat panels with clean lines and subtle textures. Whether you prefer a classic aesthetic or something more avant-garde, down ceilings offer endless possibilities that cater to various tastes and preferences.
As you explore your options, keep in mind that following a step-by-step guide can simplify the DIY process, ensuring that your vision comes to life seamlessly.
Planning Your DIY Project on Designing of Bedroom Down Ceiling

Before diving into the exciting world of DIY down ceiling designs, it’s crucial to first assess your bedroom space and ceiling height. A lower ceiling may lend itself well to cozy, intimate designs, while higher ceilings can accommodate more dramatic features.
For instance, if you have an 8-foot ceiling, consider designs that draw the eye upwards without overwhelming the space. An engaging approach might be to incorporate a layered ceiling that adds depth without taking away from the room’s overall feel. Take measurements carefully and visualize how the new ceiling will interact with existing architectural elements and furniture.
Budget considerations play a pivotal role in any DIY project, and down ceilings are no exception. Establishing a clear budget not only helps you avoid overspending but also guides your material selection. For example, if you’re working with a tighter budget, opting for lightweight materials like foam panels or plywood can still yield impressive results.
Alternatively, if you’re willing to invest a bit more, consider high-quality wood or even decorative plaster. Remember, some of the most stunning interior design tips revolve around smart spending—investing in a few standout pieces can elevate your entire design aesthetic.
To ensure a successful installation, you’ll need to gather the right tools. A basic toolkit should include a measuring tape, level, utility knife, and a drill for securing your panels. Additionally, having a step ladder or scaffolding will make reaching those higher areas much easier and safer.
It’s also wise to have safety gear on hand, such as goggles and masks, especially when cutting materials or working with insulation. By preparing your workspace and ensuring you have all necessary tools at the ready, you’ll set yourself up for a smooth and enjoyable DIY experience.
Ultimately, planning your DIY down ceiling project is about balancing creativity with practicality. With careful assessment of your space, thoughtful budgeting, and the right tools, you can create stunning ceiling designs that transform your bedroom into an inviting retreat. So roll up your sleeves and let your creativity shine!
Step-by-Step Guide to Installation of Down Ceiling For Your Bedroom
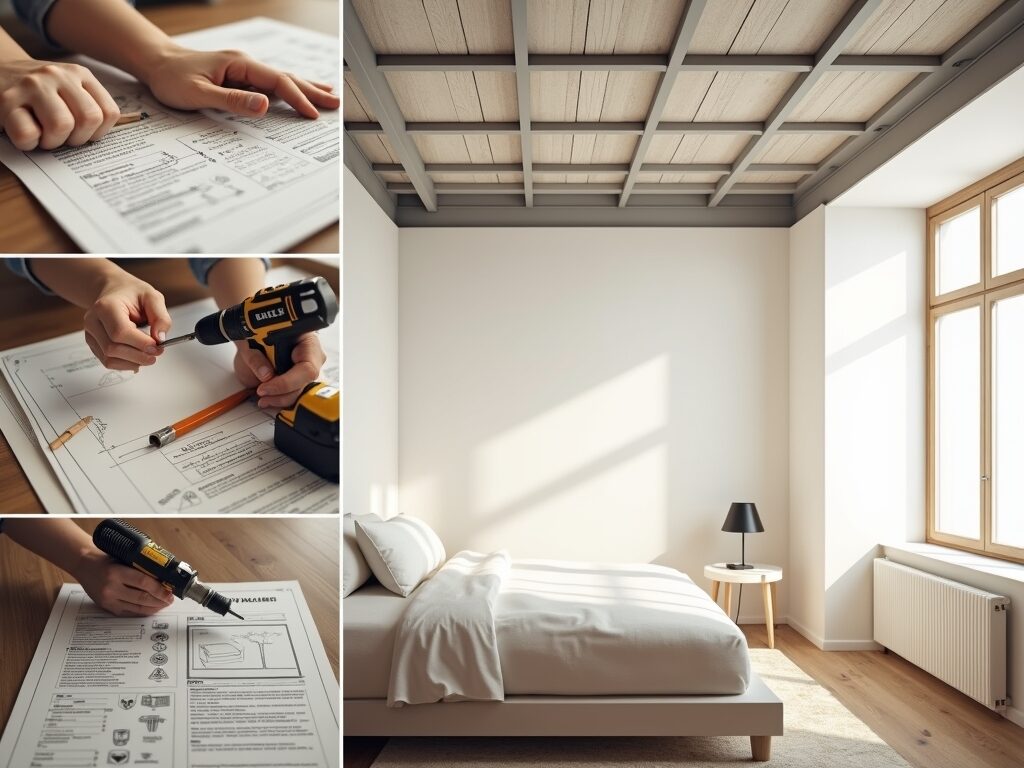
Embarking on your DIY down ceiling design for the bedroom can be an exciting home improvement project that transforms your space. The first step is to prepare the room by clearing out furniture and covering the floors with drop cloths to protect them from dust and debris.
Gather all necessary materials, including ceiling panels, adhesive, a saw, a measuring tape, and a level. It’s also wise to have safety goggles and a dust mask on hand to ensure a safe working environment. By having everything ready before you start, you’ll streamline the process and minimize interruptions.
Once your workspace is ready, it’s time to mark the layout for your down ceiling. Begin by measuring the dimensions of your bedroom to determine how many panels you’ll need and how they will fit together. Using a pencil, lightly mark the outline on the existing ceiling where the panels will go.
A helpful tip is to create a grid pattern; this will guide you in cutting the panels evenly and placing them accurately. As you cut the panels to size, consider using a utility knife for a clean edge—this will not only enhance the appearance but also make installation smoother.
Securing the panels in place is where your vision starts to come alive. Apply adhesive generously to the back of each panel, ensuring it covers the edges well for a strong hold. Press the panels firmly against the ceiling according to your marked layout, using a level to check that they’re straight and aligned.
Once all panels are installed, take a moment to add finishing touches like trim or molding around the edges. This personal touch can elevate your down ceiling design, making it look professionally done while still showcasing your unique style.
Remember, patience is key during this phase; ensuring everything is secure and properly aligned will yield a stunning final result that you can proudly show off.
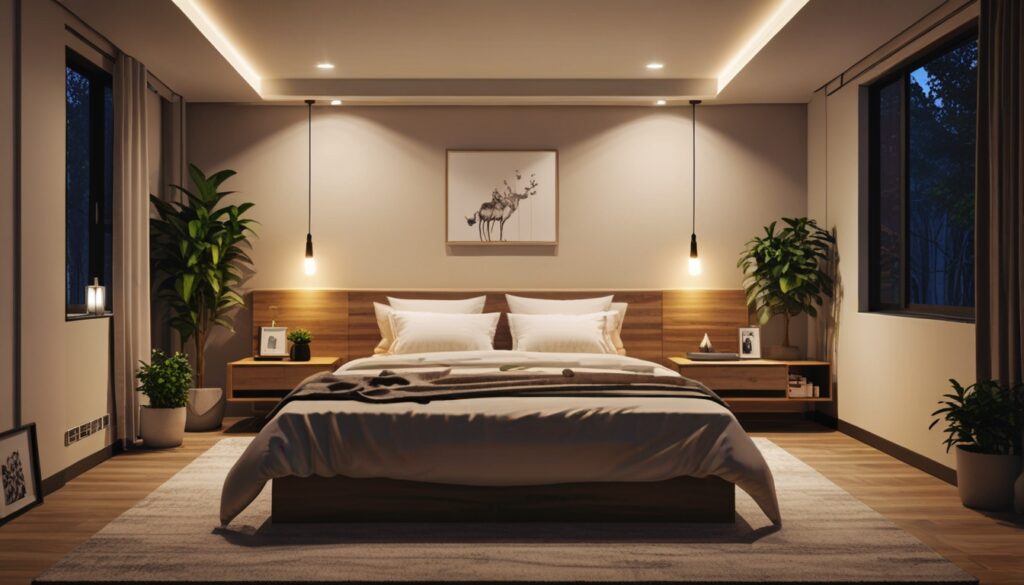
Choosing the Right Lighting To Your Down Ceiling
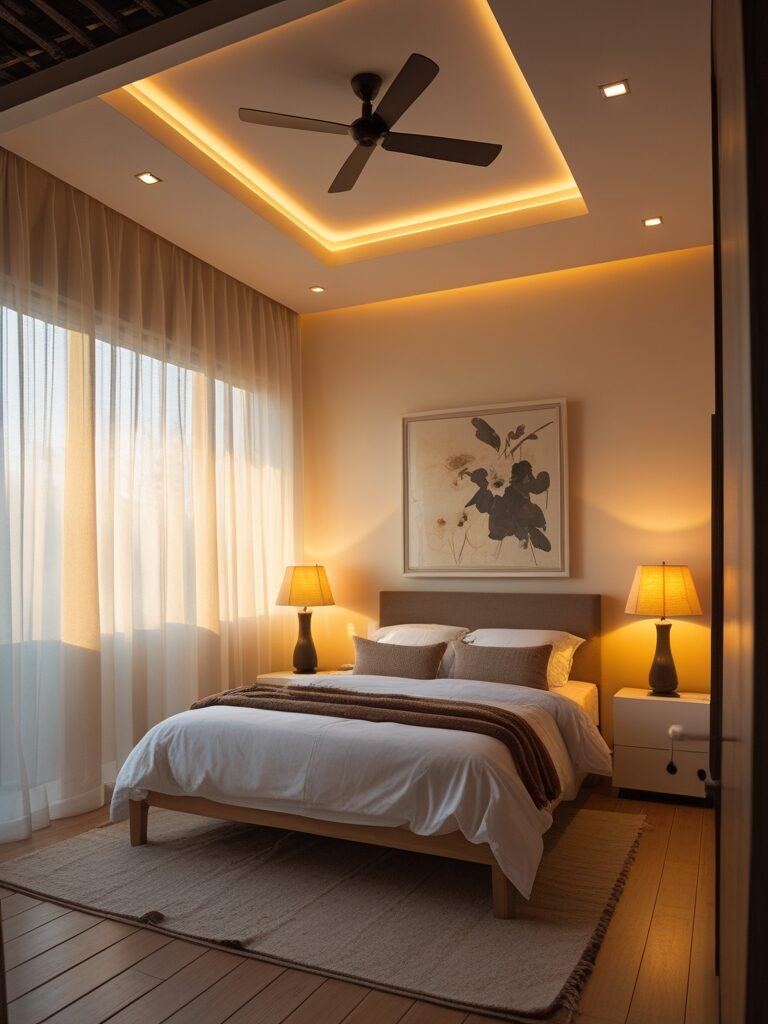
When it comes to enhancing your newly designed down ceiling, selecting the right lighting fixtures is crucial.
Down ceilings create a unique architectural feature that can dramatically influence the overall ambiance of your bedroom.
Consider installing recessed lighting, which offers a sleek and modern look that seamlessly integrates into the ceiling’s design.
This type of lighting not only highlights the features of your down ceiling but also provides a clean, unobtrusive glow that can be adjusted based on your mood.
For a more decorative touch, pendant lights or flush-mounted fixtures can serve as stylish ceiling options that add character while illuminating your space.
Placement is key when it comes to optimal illumination. A general rule of thumb is to space your recessed lights evenly around the room, with approximately 4-6 feet between fixtures, depending on the height of your ceiling.
This ensures that light is distributed evenly throughout the room, avoiding dark corners and creating a warm, inviting atmosphere.
If you are incorporating pendant lights, consider hanging them at varying heights for an artistic flair while maintaining functional lighting over key areas like bedside tables or reading nooks. Additionally, dimmer switches can enhance versatility, allowing you to adjust the brightness according to different activities or times of day.
For those looking to keep costs down without sacrificing style, energy-efficient lighting options are abundant and budget-friendly. LED bulbs are not only long-lasting but also consume significantly less energy compared to traditional incandescent bulbs.
By choosing LED recessed lights or fixtures, you can enjoy reduced electricity bills while still achieving a beautifully lit space. Additionally, consider smart lighting solutions that allow you to control brightness and color temperature through a smartphone app, giving you flexibility and convenience while being mindful of your budget.
In conclusion, choosing the right lighting for your down ceiling design is an essential step in transforming your bedroom into a stylish retreat.
By exploring various fixture options and considering placement strategies, you can create an inviting atmosphere that enhances the aesthetics of your space. With budget-friendly materials and energy-efficient choices available, achieving the perfect lighting for your DIY project has never been more accessible.
Some Ceiling Design Lights For Bedroom
Adding Personal Touches to DIY Down Ceiling Design For Your Bedroom
Once you have installed your down ceiling design for the bedroom, it’s time to infuse your personal style into this transformative feature. Customizing your ceiling with paint or textures can dramatically enhance its visual appeal.
For instance, consider a soft, matte finish in a serene color like pale blue or muted lavender to evoke a calming atmosphere. Alternatively, textured finishes, such as a stucco or wood grain effect, can add depth and character, making the ceiling a standout element of your room. Don’t hesitate to experiment with metallic accents or stenciled patterns for a bold statement that reflects your personality.
Incorporating decorative elements like moldings or trim can elevate your down ceiling design to new heights—literally! Crown molding is a classic choice that seamlessly transitions from wall to ceiling, providing a polished look that enhances the overall aesthetics of your bedroom.
For a more contemporary twist, consider using geometric trim to create a unique visual effect. You could also add LED strip lighting along the edges of the molding for a modern touch that adds ambiance while highlighting the architectural features of your ceiling.
Integrating color schemes with your existing decor is crucial for achieving a cohesive design. If your bedroom features a neutral palette, use the down ceiling as an opportunity to introduce subtle color pops that harmonize with your furnishings.
For example, if your bedding has hints of sage green, consider painting your ceiling in a complementary shade that enhances the tranquility of the space. Conversely, if you prefer a bolder approach, choose a statement color for your ceiling that contrasts with the walls while still aligning with your overall theme, such as a deep navy against soft gray walls.
Ultimately, the goal is to create a personalized sanctuary that resonates with your style and enhances your daily living experience.
By thoughtfully customizing your down ceiling design with paint, textures, and decorative elements, you can transform not just the look of your bedroom but also the way you feel in the space. Embrace creativity and allow your imagination to guide you as you add those final touches that make your room uniquely yours.
Maintenance Tips for Longevity of Down Ceiling For Bedroom

Once you’ve successfully installed your DIY down ceiling, the next step is to ensure its longevity through proper maintenance and care. Regular cleaning is essential to keep your ceiling looking fresh and appealing.
Start by dusting the surface with a soft cloth or a feather duster to remove any accumulated dust and cobwebs. For deeper cleaning, use a damp sponge or cloth with a mild detergent solution. Avoid harsh chemicals, as they can damage the finish of your ceiling panels. If you notice stains or discoloration, addressing them promptly will prevent them from becoming permanent eyesores.
Common issues that may arise with down ceilings include sagging panels or separation at the seams. These problems often occur due to humidity fluctuations or improper installation. To address sagging, check the support structure and ensure that all panels are securely fastened.
If you encounter seams that have separated, you can apply a strong adhesive designed for ceiling materials to reattach them. For added reinforcement, consider using trim or molding to cover seams while also enhancing the overall aesthetic of your space.
Ensuring safety and structural integrity is vital for any home improvement project. Regularly inspect your down ceiling for signs of damage, such as cracks or water stains, which could indicate underlying issues like leaks. If you live in a humid climate, consider investing in moisture-resistant panels to mitigate potential problems.
Additionally, if you plan to install lighting fixtures in your down ceiling, always adhere to electrical codes and guidelines to prevent hazards. A well-maintained ceiling not only enhances your bedroom’s visual appeal but also contributes to the overall safety and comfort of your home.
Incorporating these maintenance tips into your routine will help keep your down ceiling looking pristine while extending its lifespan. Remember that a little effort goes a long way in preserving the beauty of your DIY project. By addressing common issues swiftly and keeping an eye on structural integrity, you’ll ensure that your transformed bedroom remains a sanctuary of style and comfort for years to come.
Inspiration from Successful Projects

Transforming your bedroom with a DIY down ceiling design can be a thrilling experience, especially when you see the stunning before-and-after transformations shared by fellow DIY enthusiasts.
For instance, one homeowner in Ohio showcased their journey on social media, where they documented the process of replacing a plain, flat ceiling with a sleek, modern down ceiling featuring recessed lighting.
The dramatic shift not only added height to their room but also created an inviting atmosphere perfect for relaxation.
This project serves as a fantastic example of how a little creativity and effort can lead to remarkable results.
Another inspiring project comes from a couple in California who decided to incorporate rustic elements into their down ceiling design for the bedroom. They used reclaimed wood planks to create a warm, cozy aesthetic that perfectly complemented their farmhouse style.
By adding decorative moldings and a soft color palette, they transformed their space from drab to fab, all while staying within a reasonable budget. Their innovative approach illustrates that with some unique materials and a clear vision, anyone can achieve a personalized sanctuary that reflects their style.
For those seeking additional inspiration, numerous online resources are available to help spark your creativity. Websites like Pinterest and Instagram are treasure troves of DIY down ceiling designs for bedrooms, featuring everything from minimalist styles to extravagant coffered ceilings.
You can also find helpful tutorials on platforms like YouTube, where experienced DIYers share their insights and tips for successful installations. Whether you’re looking for simple elegance or bold statements, these resources provide endless ideas to help you embark on your own down ceiling project.
In conclusion, drawing inspiration from successful projects can motivate you to take on your DIY down ceiling design for the bedroom. Remember that each transformation tells a unique story, reflecting the homeowner’s personality and creativity. As you explore these examples and utilize available resources, you’ll discover that with determination and a bit of ingenuity, your dream bedroom is just a project away!
Final Thoughts on Your DIY Down Ceiling Design Journey For Bedroom
In conclusion, transforming your bedroom with a DIY down ceiling design is an exciting and rewarding project that enhances both aesthetics and functionality. By following the key steps—assessing your space, selecting materials, installing panels, and adding personalized touches—you can create a stunning ceiling that reflects your unique style. Remember to choose lighting that complements your new design and maintain it for longevity.
Embrace your creativity as you embark on this journey; each choice you make will contribute to the overall feel of your space. Whether you’re opting for bold colors or subtle textures, your personal touch will make all the difference.
There’s immense satisfaction in completing a DIY project, especially one that elevates your living environment. So gather your tools, unleash your imagination, and enjoy the transformation that a well-executed down ceiling design can bring to your bedroom!
FAQs for Down Ceiling Design for Your Bedroom with DIY Magic
1. What is a down ceiling design?
A down ceiling design, often referred to as a drop ceiling, involves lowering the ceiling height with a secondary framework that can enhance aesthetics and acoustics while concealing wires and ducts.
2. Can I install a down ceiling in my bedroom myself?
Yes, with the right tools and materials, a down ceiling can be installed as a DIY project. However, it’s essential to follow proper guidelines and safety protocols.
3. What materials do I need for a DIY down ceiling project?
Typically, you will need ceiling tiles or panels, grid systems, suspension wires, a measuring tape, a level, and appropriate tools such as a saw and drill.
4. How much does it cost to create a down ceiling in my bedroom?
The cost can vary significantly based on materials and room size; however, on average, you might expect to spend between $1 to $3 per square foot for materials.
5. How long does it take to install a down ceiling?
The installation process can take anywhere from a few hours to a couple of days, depending on the complexity of the design and the size of the room.
6. Can I incorporate lighting into my down ceiling design?
Absolutely! Recessed lighting or decorative fixtures can be seamlessly integrated into your down ceiling, enhancing both functionality and style.
7. Is it possible to remove the down ceiling if I change my mind later?
Yes, a down ceiling can be removed if desired. It typically involves detaching the tiles and grid system, making it relatively straightforward if done carefully.
8. Are there any design considerations I should keep in mind?
When designing your down ceiling, consider the height of the room, the style of the existing décor, and how the new ceiling will interact with natural light and ventilation in the space.


